How I make lecture videos
A number of people1 have asked how I make the online lecture videos for my introductory machine learning course. You can see some examples on my YouTube channel.2 I think this video is a relatively representative example.
This post briefly outlines my workflow. My process is specifically tied to an Android tablet with a stylus and software running on Linux, which I realise might be a bit obscure. But I think it should be possible to translate some of the process to other platforms (e.g. capturing the video on an iPad and editing it on Windows).
Overview of my workflow
Before getting into the details, here are the main steps:
- On my PC, I create slides containing all the graphics I want to incorporate. I use the Beamer package with LaTeX, but you should be able to use anything (e.g. PowerPoint). I then generate a PDF of the slides. This forms a base for the whole lecture.
- On my tablet, I import the PDF into an application called LectureNotes.
- On my tablet, I plan out what I am going to write where in LectureNotes.
- On my tablet, I use an application called AZ Screen Recorder to capture the actual lecture audio and video: everything I draw on the screen (in LectureNotes) and everything I am saying are recorded and saved in a video.
- On my PC, I import the captured raw video into an application called Shotcut.
- On my PC in Shotcut, I then extensively edit the video. I crop the input video to only show the relevant area captured from the tablet; I edit audio levels; and I try to cut out where I messed up during the recording (e.g. background cat noises).
- On my PC, I export the video from Shotcut and upload it to YouTube.
On my PC: Create slides (step 1)
In my in-person lectures, I normally used a mix of slides that I prepared beforehand (e.g. showing a dataset) and scribbles on the black board (e.g. developing the mathematics for a particular model). In my video lectures I follow the same mixed strategy.
Step 1 involves developing the prepared material. On my PC using LaTeX with Beamer, I create slides with graphs, bulleted lists, typed text and links. I also have some completely blank slides where I will write things on my tablet. An example is shown below.
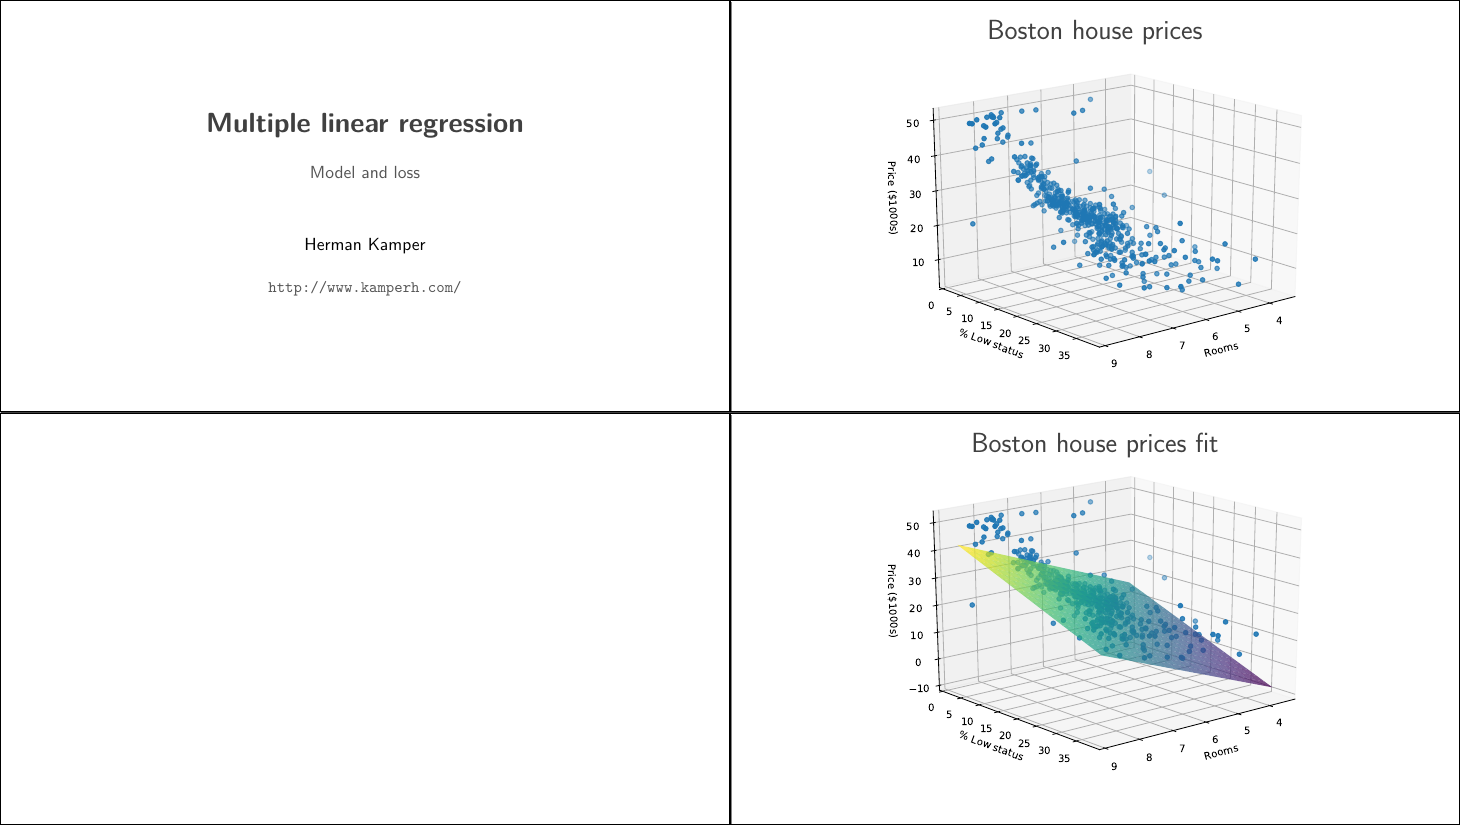 An example of the base slides that I create in LaTeX with Beamer. The plots in
this specific example are created in Python with Matplotlib and then included
in the LaTeX source.
An example of the base slides that I create in LaTeX with Beamer. The plots in
this specific example are created in Python with Matplotlib and then included
in the LaTeX source.
I then export the slides to PDF. The only important thing here is that I make sure the resulting PDF has a width-to-height ratio of 16:9, to match the size and resolution of subsequent steps. This is not the standard setting in Beamer, so I use the following preamble:
\documentclass[hyperref,table,dvipsnames,aspectratio=169,11pt]{beamer}
If you are using PowerPoint and none of this makes sense, don’t cry. Just make sure the PDF you get out has an aspect ratio of 16:9.
On my tablet: Plan and record the lecture (steps 2 to 4)
I have a Samsung Tab S6 tablet with Android on which I record my lectures. I specifically use the LectureNotes application available on the Play Store. I use the paid version, which is not that expensive.
Step 2 involves importing my slides. I Import PDF as new notebook by clicking
the menu on the top-right in LectureNotes. If the option to import a PDF
doesn’t show, then you need to install
PDFView,
also from the Play Store. I import the PDF with a paper size of 2432 by 1368,
as shown below.
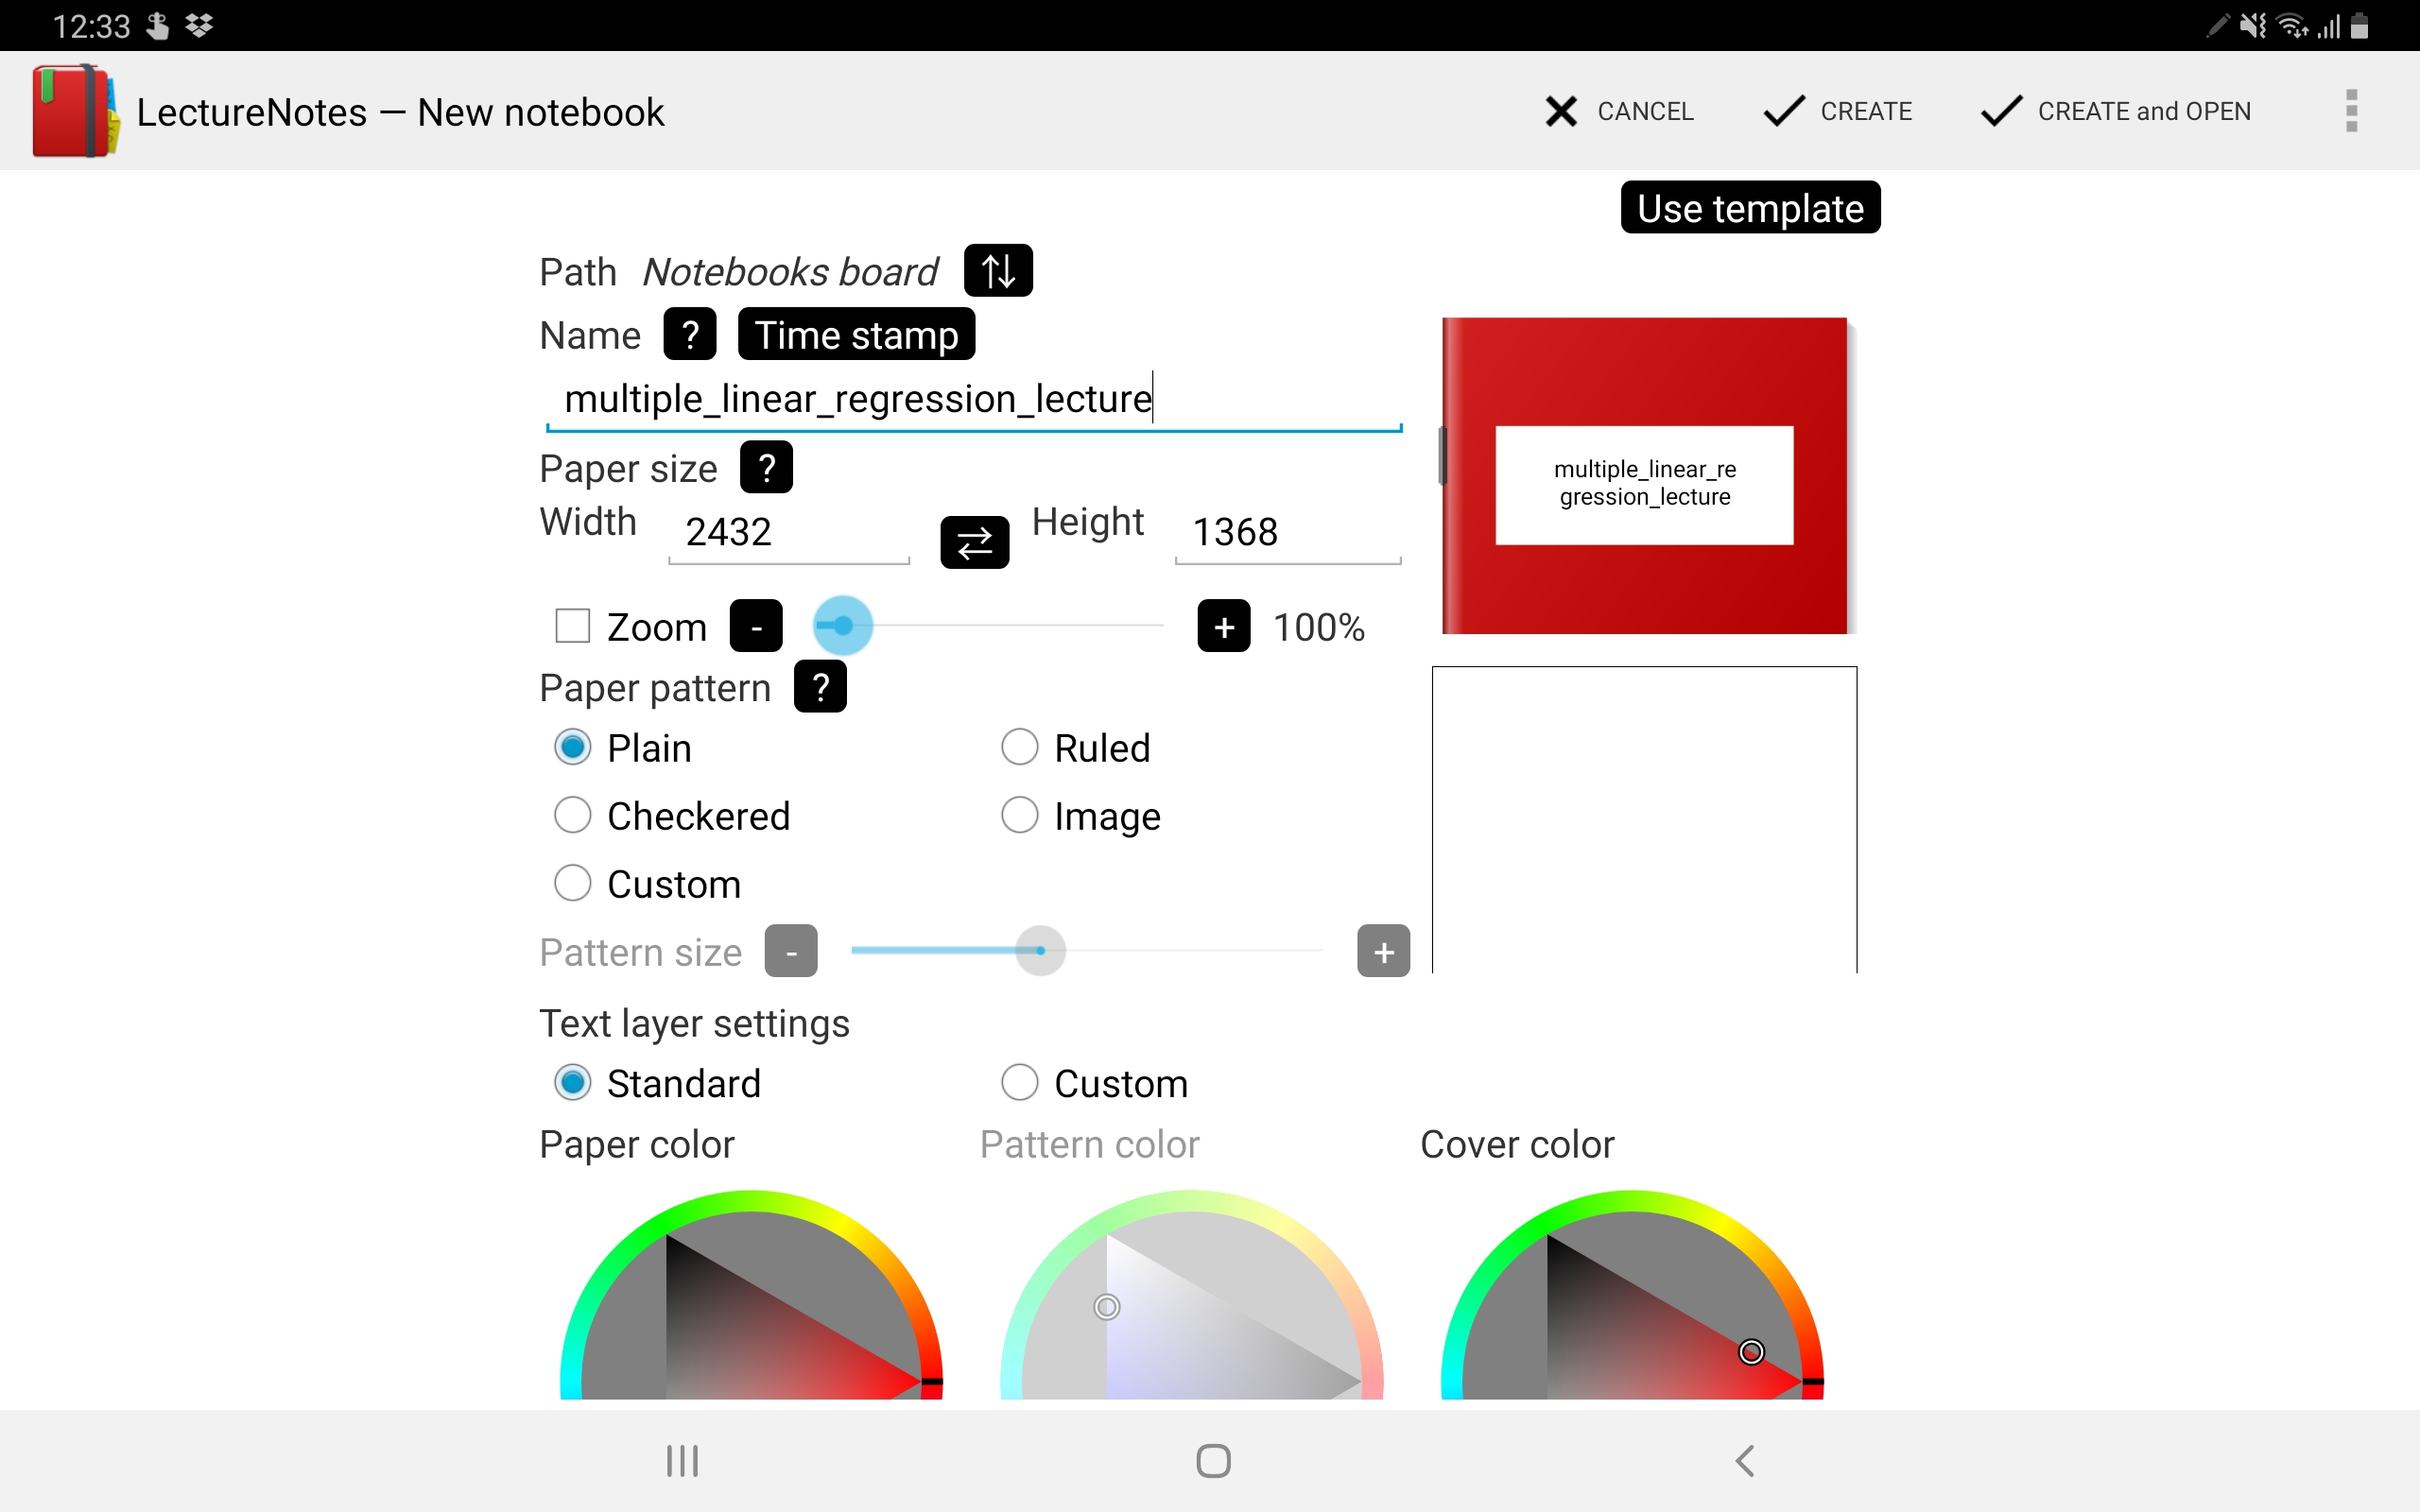 The settings I use when importing a PDF into LectureNotes.
Once the PDF has opened, I select Fit heigh from the menu. LectureNotes has a
bit of a learning curve, but you can customise a ton of things. I set it up so
that you have a small set of coloured pens showing on the top left together
with some basic shapes:
 What my view looks like after customising my LectureNotes menus.
Step 3 involves planning out what I am going to write where on my slides.
Step 4 involves actually recording the screen and audio. For this I use AZ Screen Recorder, also available from the Play Store. Here I just use the free version since I don’t need any of the extra features.
Normally I record a few minutes showing my face while giving an introduction to the video. You can turn the camera on and off in AZ Screen Recorder’s menu and move the camera box around to an appropriate position on top of your working area in LectureNotes. After the introduction, I turn off the camera and give the lecture, talking and scribbling as I go along. The video is then saved on the tablet.
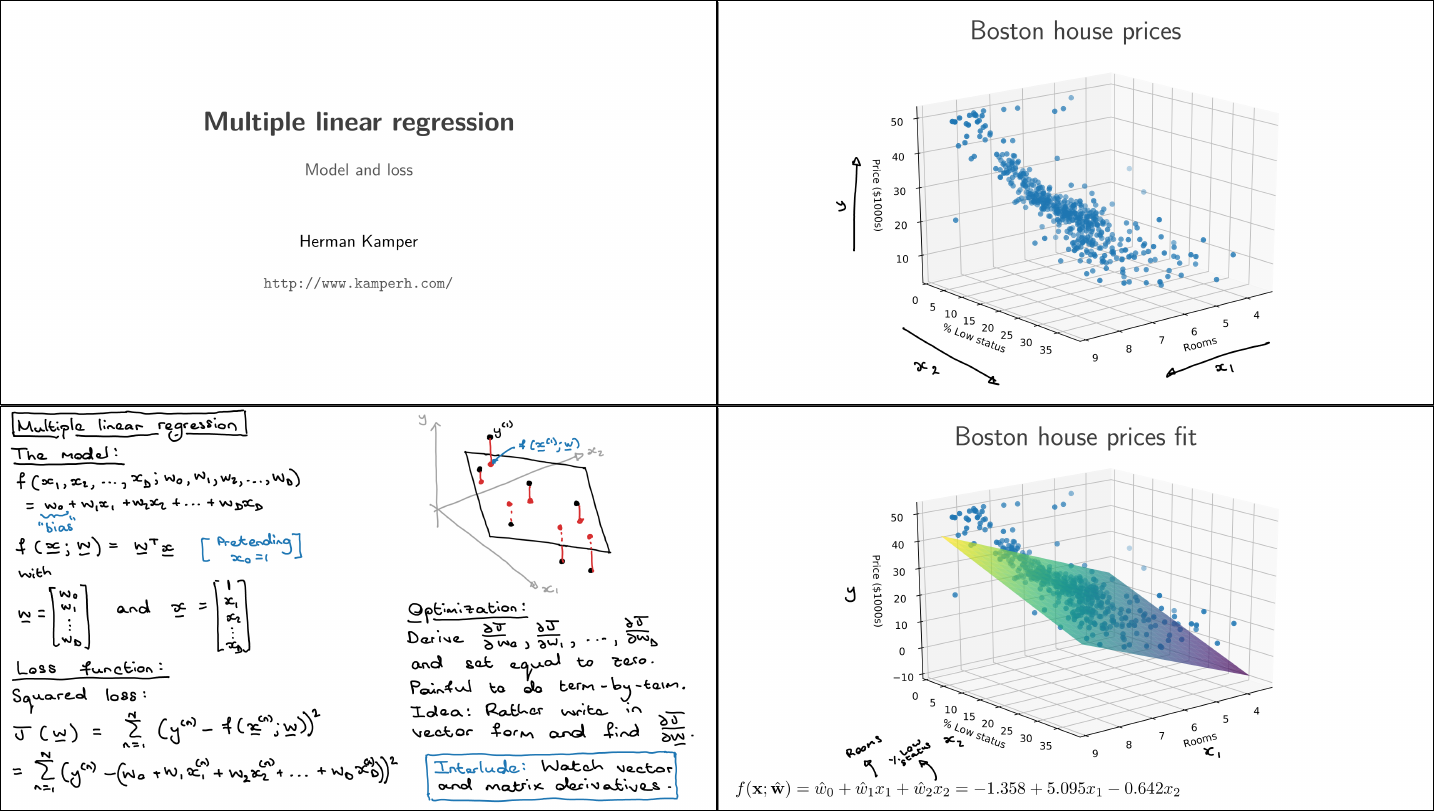 An example of what the slides look like after recording on my tablet.
On my PC: Import and edit the video (steps 5 to 7)
Step 5 involves importing the recorded video into Shotcut. Sometimes I recorded the lecture in multiple takes, in which case I would import multiple videos into Shotcut.
When you start a new project in Shotcut, you can select a Video mode. Here we
need to change things to match the aspect ratio and sizes that we have been
working with up to here. I normally create a custom video mode by going to
Settings -> Video Mode -> Custom -> Add.... I then select a
resolution of 1568 by 882, an aspect ratio of 16 by 9, and I give the settings
a name so that I can quickly use it again for future videos.
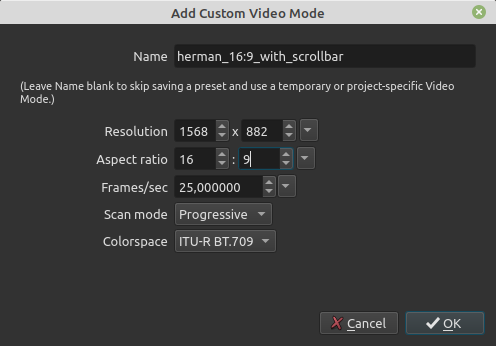 My Shotcut video mode settings.
After creating a new project, you can import videos by dragging them to the
Playlist. I sometimes get a warning that my video is recorded at a variable
frame rate; I just ignore this and click cancel until the warning goes
away.3
Step 6 is then where the editing starts. You can drag the videos from the playlist to the tracks at the bottom of the Shotcut window. The first thing to then do is to crop the video so that you don’t see the LectureNotes menu and borders. I.e., you don’t want your video to look like this:
 The view in Shotcut without any cropping. Notice in the figure below how the
LectureNotes border has disappeared.
The view in Shotcut without any cropping. Notice in the figure below how the
LectureNotes border has disappeared.
To do this, you click on your clip in the bottom track, and then add a Crop:
Source filter. I crop 101 pixels from the top, 60 from the bottom, and 71 from
the sides, but sometimes this takes a bit of fiddling.
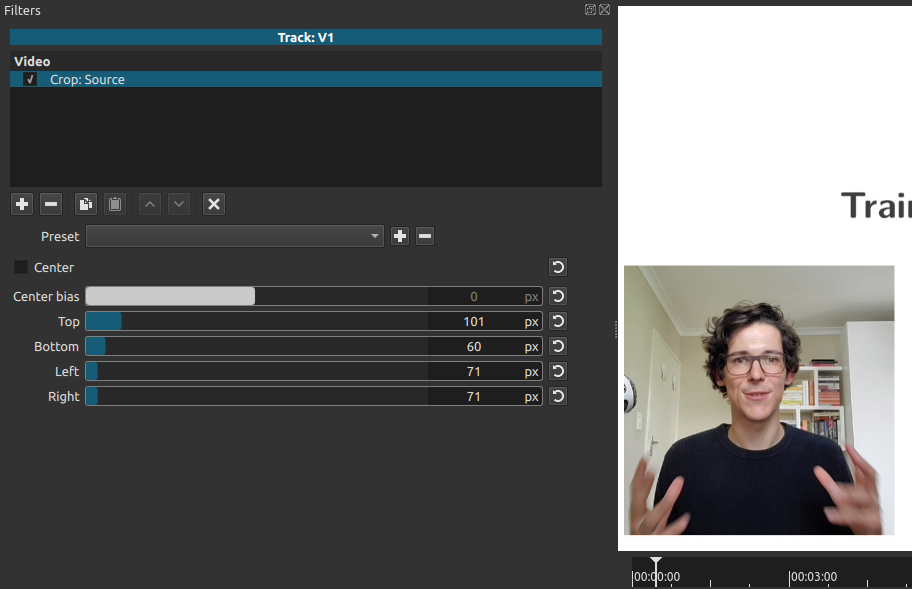 My crop filter settings in Shotcut. Notice how the LectureNodes border
disappeared in the video preview on the right.
My crop filter settings in Shotcut. Notice how the LectureNodes border
disappeared in the video preview on the right.
Then I edit. I specifically cut out portions of the video where I made
mistakes. I make extensive use of two Shotcut shortcut keys: S, which splits
a clip at the current marked position, and X, which deletes a selected clip.
Step 7 is exporting the video. I normally select the YouTube export option,
but some of the other export settings will result in a smaller file size.
Conclusion
I hope that even a part of this description of my workflow is helpful to someone. The only additional hardware I use is a Røde Podcaster microphone, which plugs directly into my tablet through a USB dongle. This improves audio quality a little bit, but the tablet’s audio is already so good that I don’t think the cost justifies this small improvement.4
-
The exact number is two people. ↩
-
I really need followers, so please follow me on YouTube. This is shameless begging. ↩
-
Mainly because I don’t know what this means and I tried to fix it once and it didn’t seem to make a difference. ↩
-
In the unlikely event that someone from Røde reads this statement: If you are willing to give my group a sponsorship, I will shamelessly update this post to say that without a Røde microphone my lecture videos would essentially be useless. ↩